API Security with ASP.NET Core 5.0 and Azure AD for Dummies
This blog is part of a complete blog series.
- Part 1: Authentication vs authorization
- Part 2: The different actors
- Part 3: Authentication with Azure AD (this blog)
- Part 4: Authorization with Access Control List
- Part 5: Authorization with Application Roles
- Part 6: Authorization with Delegated Permissions
- Part 7: Retrieve more user information
- Part 8: Access APIs on behalf of a user (coming soon)
- Part 9: Automate the Azure AD configuration (coming soon)
API security metaphor
Let’s see how the party authentication process goes:
- Visitor: this person is authenticated via his/her passport.
- Crew: this supplier is authenticated via a signed work order.
- Ticket desk: gives each authenticated person a badge.
- Bodyguard: only allows people with a valid badge.
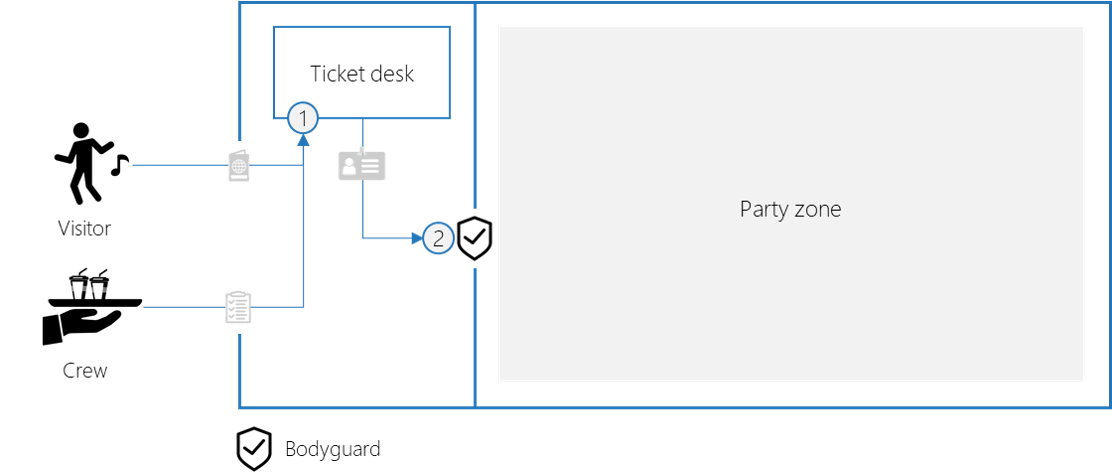
If we compare this with API security, we can convert it into this technical process
- Application with user interaction: the user authenticates through MFA, the application uses client id with secret / certificate.
- Daemon or service: the application authenticates with client id and secret /certificate. Managed identity is even a better option.
- Azure AD: for every authenticated actor, Azure AD returns a JSON Web Token (access token) that contains the required info about the actor
- Access control: the API needs to have an access control component the validates the access token, before access to the API is allowed.
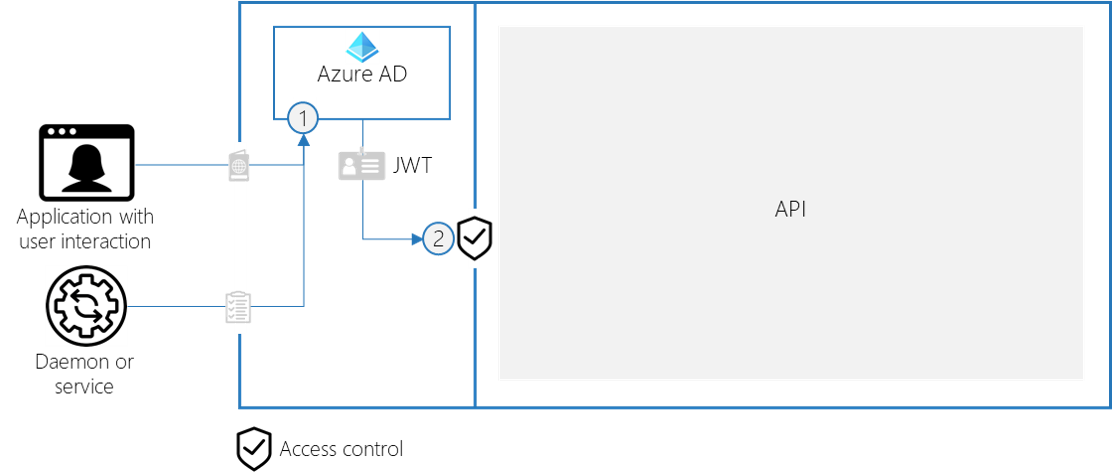
Depending on the use case, the authentication with Azure AD is performed through different OAuth2 flows. These flows should be implemented in the client applications and result in an API call that contains the JWT token in the Authorization header. Because the API must only consider the access token, a detailed description of the OAuth2 flows is not in scope for this blog series.
Azure AD configuration
The API app registration will need to have a scope configured, to allow user interaction. Next to that, the two app registrations that represent the client applications will need to be updated, to ensure that authentication via a client id and secret can take place.
Update the API
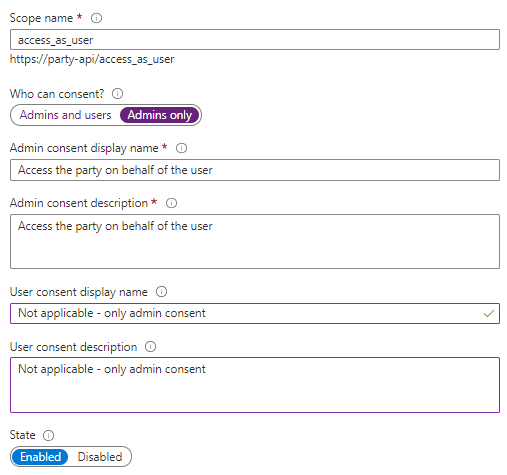
OAuth2 uses the concept of scopes. When user interaction is involved, we have to define at least one scope. In many cases, such a general scope is often named user_impersonation or access_as_user, however you can choose whatever name makes sense for you. In the next parts, we will deeper dive into the concept of scopes and how you can use them to delegate fine-grained permissions.
- Navigate to the party-api App Registration
- In the Expose an API tab, click on `+ Add a scope`
- Specify a human-readable Application ID URI, a unique identifier that will represent your API
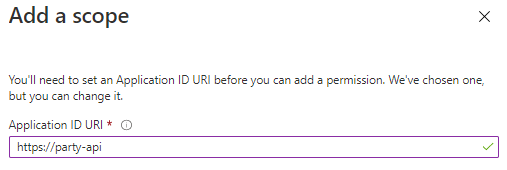
- Copy the Application ID URI, you will need it later. Click Save and continue
- Configure the scope like below and click Add scope
Update the Daemon App
We will use the Client Credentials flow to authentication the daemon app, without any user interaction.
- Navigate to the daemon-client-app App Registration
- In the Certificates and secrets tab, click on `+ New client secret`
- Specify a new and desired expiration and click on Add
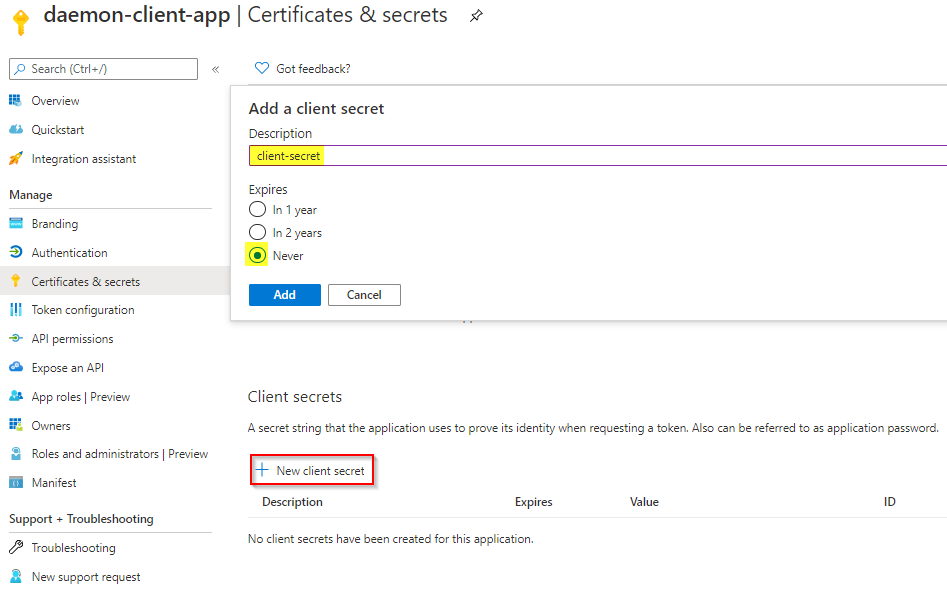
- Copy the value of the client secret, you will need it later on.
It is important to treat the client id and secret as real credentials. More information can be found in this blog post.
Update the User App
We will use the Authorization Code flow to authenticate the user. Therefore, we have to register the callback URL of our application. We will simulate the application with Postman, which has this out-of-the-box redirect URI: https://app.getpostman.com/oauth2/callback
- Navigate to the user-client-app App Registration
- In the Authentication tab, click on `+ Add a platform`
- Select Web, specify the redirect URL and click Configure

- In the Certificates and secrets tab, click on `+ New client secret`
- Specify a new and desired expiration and click on Add
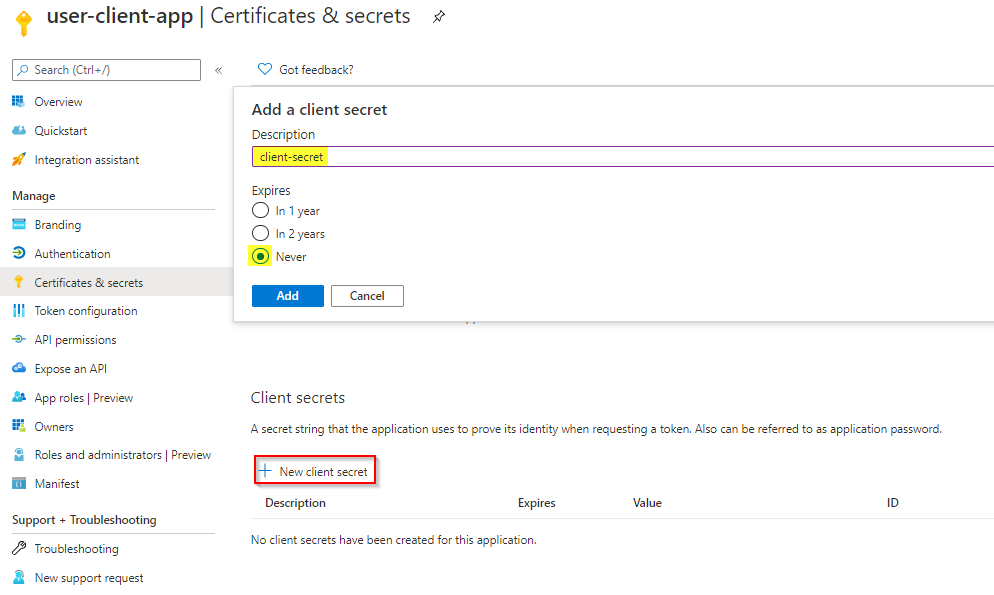
- Copy the value of the client secret, you will need it later on.
It is important to treat the client id and secret as real credentials. More information can be found in this blog post.
- In the API Permissions tab, click on `+ Add a permission`
- Select the party-api, under the My APIs tab
- Select Delegated Permissions, choose the access_as_user scope and click Add permissions

- An Azure AD administrator must Grant admin consent for <Your Directory>

The authentication process
Let’s see how we can authenticate the two client applications, that are simulated by Postman.
Authenticate the Daemon App
- Create a new request in Postman and specify one of the GET endpoints of the party API
- In the Authorization tab, select OAuth 2.0 as the Type
- Configure like this:
- Grant Type: Client Credentials
- Access Token URL: https://login.microsoftonline.com/<AZURE-AD-TENANT-ID>/oauth2/v2.0/token
- Client ID: <DAEMON-CLIENT-APP-CLIENT-ID>
- Client Secret: <DAEMON-CLIENT-APP-CLIENT-SECRET>
- Scope: <API-APPLICATION-ID-URI>/.default
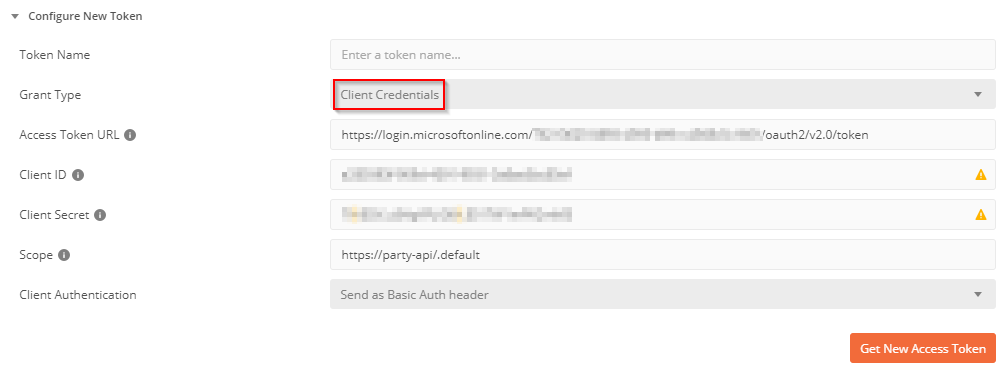
- Click on Get New Access Token
- Click Proceed, copy the access token and click Use Token
- You can inspect the access token on jwt.ms
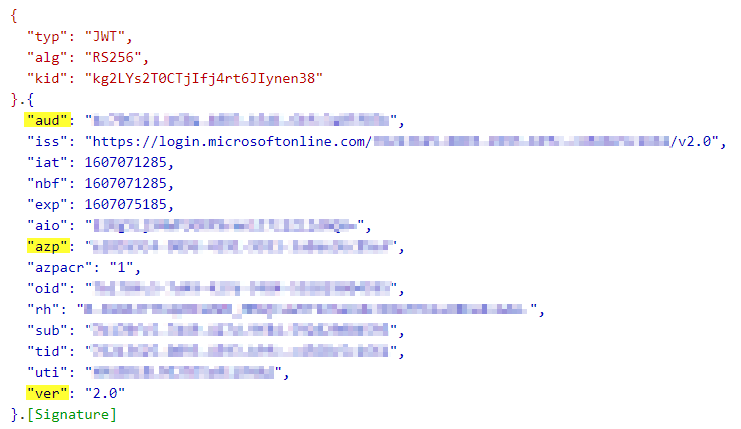
- The most important claims are:
- aud: <PARTY-API-CLIENT-ID> (the audience)
- azp: <DAEMON-CLIENT-APP-CLIENT-ID> (the client application)
- ver: indicates the version that is used
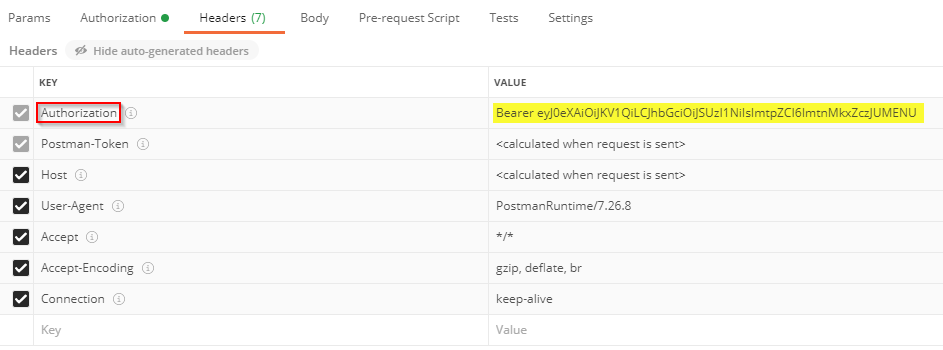
- Note that Postman automatically adds the access token as a Bearer token in the Authorization header
- You can call the Party API, which does not perform any security validation at this time.
Authenticate the User App
- Create a new request in Postman and specify one of the GET endpoints of the party API
- In the Authorization tab, select OAuth 2.0 as the Type
- Configure like this:
- Grant Type: Authorization Code
- Callback URL: https://app.getpostman.com/oauth2/callback
- Auth URL: https://login.microsoftonline.com/<AZURE-AD-TENANT-ID>/oauth2/v2.0/authorize
- Access Token URL: https://login.microsoftonline.com/<AZURE-AD-TENANT-ID>/oauth2/v2.0/token
- Client ID: <USER-CLIENT-APP-CLIENT-ID>
- Client Secret: <USER-CLIENT-APP-CLIENT-SECRET>
- Scope: <API-APPLICATION-ID-URI>/access_as_user
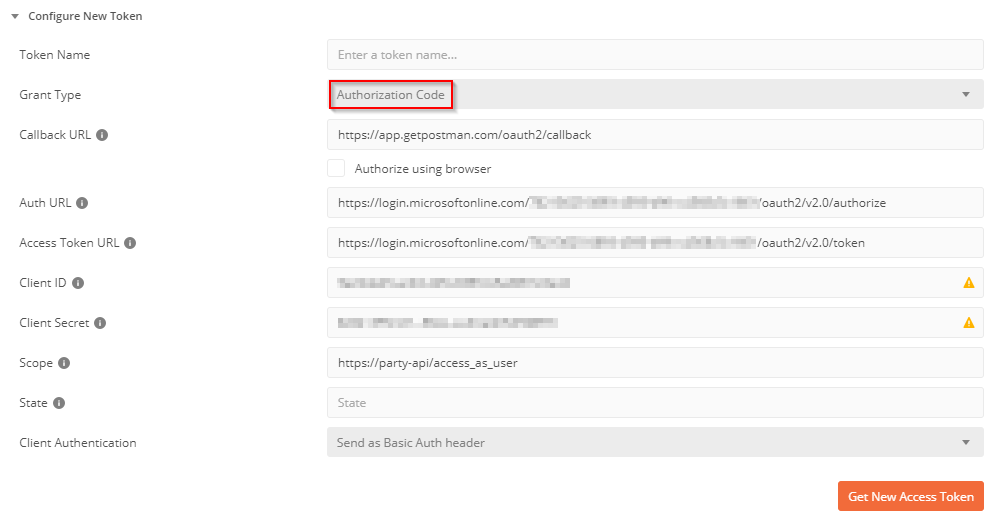
- Click on Get New Access Token
- Login with a user of the configured Azure AD tenant

- Click Proceed, copy the access token and click Use Token
- You can inspect the access token on jwt.ms
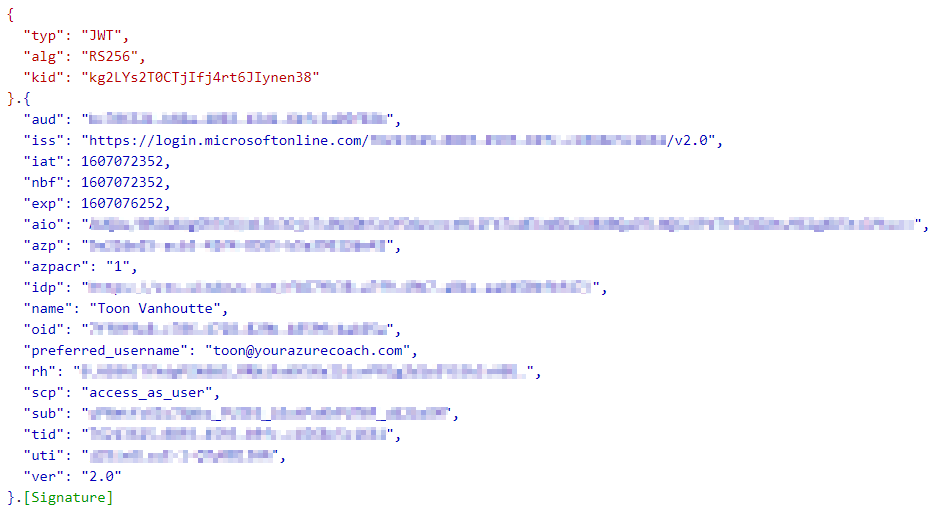
- You can see that some extra claims have been introduced:
- name: name of the logged in user
- scp: a list of scopes that have been consented (by user or and administrator)
- Note that Postman automatically adds the access token as a Bearer token in the Authorization header

- You can call the Party API, which does not perform any security validation at this time.
If you are using Open ID Connect (which is an authentication extension of OAuth2), the application will receive an ID token and an access token. The ID token should remain in the application itself, this is also indicated in the audience of the token. The access token is the one that should be use to access the API.
Enforce authentication on the API
Now it’s time to secure our API, by enforcing authentication.
Global authentication enforcement
- Open the PartyApi solution from the `01-starter-files` folder
- Add the Nuget package Microsoft.Identity.Web

- Update the Startup.cs file, by adding injecting the authentication middleware in the Configure method
// This statement must be added before the authorization middelware
app.UseAuthentication();
app.UseAuthorization();
- Update the Startup.cs file, by adding this statement on top of the ConfigureServices method
services.AddAuthentication(JwtBearerDefaults.AuthenticationScheme).AddMicrosoftIdentityWebApi(Configuration, "AzureAd");
- Update the appsettings.json with the “AzureAd” configuration section:
 "AzureAd": {
    "Instance": "https://login.microsoftonline.com/",
    "TenantId": "<AZURE-AD-TENANT-ID>",
    "ClientId": "<PARTY-API-CLIENT-ID>"
  },
Instead of decorating the controller with the [Authorize] attribute, I want to centrally enforce authentication on all controllers that will be added to my API in the future.
- Update the Startup.cs file by replacing the services.AddControllers(); statement in the ConfigureServices method
//This enforces global authentication, similar to using the [Authorize] attribute on controllers and / or operations
services.AddControllers(options =>
{
   var policy = new AuthorizationPolicyBuilder()
                    .RequireAuthenticatedUser()
                    .Build();
   options.Filters.Add(new AuthorizeFilter(policy));
});
This will ensure that every single API operation requires authentication. This authentication includes:
- Signature validation of the access token
- Lifetime validation of the access token (expiration)
- Check if the audience is set to the client id of the API
- Check if the issuer is correct
- Check if there is a role or a scope claim in the access token
It’s time to test if the authentication enforcement works fine:
- Accessing the API without an access token, should result in a 401 Unauthorized
- Accessing the API with an invalid access token, should result in a 401 Unauthorized
The details of the validations are available in the WWW-Authenticate HTTP response header - Accessing the API with the user-client-app access token, should result in a 200 OK
- Accessing the API with the daemon-client-app access token, results in a 500 Internal Server Error:
IDW10201: Neither scope or roles claim was found in the bearer token.
How to overcome this exception, is explained in the next part of this blog series.
Override the global authentication
In some scenarios, you might have the requirement that several API operations should not be secured at all, they can also be consumed by non-authenticated clients. In our Party API scenario, this is the case to call the entrance operation, because everyone is allowed to get into the entrance, because the tickets are provided over there.
- Decorate the GetIntoTheEntrace() method of the PartyController, with the [AllowAnonymous] attribute.
[HttpGet]
[AllowAnonymous]
[Route("entrance")]
public PartyExperience GetIntoTheEntrance()
- Accessing the party/bar operation without an access token, should still result in a 401 Unauthorized
- Accessing the party/entrance operation without an access token, should now result in a 200 OK
Conclusion
In this part, we discussed how to globally enforce authentication on your APIs and how to override it on specific controllers or operations. At this moment, there is no authorization in place. Everyone of your organization that can successfully authenticate, is allowed to access the API. In most scenarios, this is not sufficient. The next parts of this blog series explain different ways of authorization.


