API Security with ASP.NET Core 5.0 and Azure AD for Dummies
This blog is part of a complete blog series.
- Part 1: Authentication vs authorization
- Part 2: The different actors
- Part 3: Authentication with Azure AD
- Part 4: Authorization with Access Control List
- Part 5: Authorization with Application Roles (this blog)
- Part 6: Authorization with Delegated Permissions
- Part 7: Retrieve more user information
- Part 8: Access APIs on behalf of a user (coming soon)
- Part 9: Automate the Azure AD configuration (coming soon)
API security metaphor
This type of authorization is very popular and is better known as role based access control (RBAC). This authorization method is very handy when you want to restrict access, based on roles.
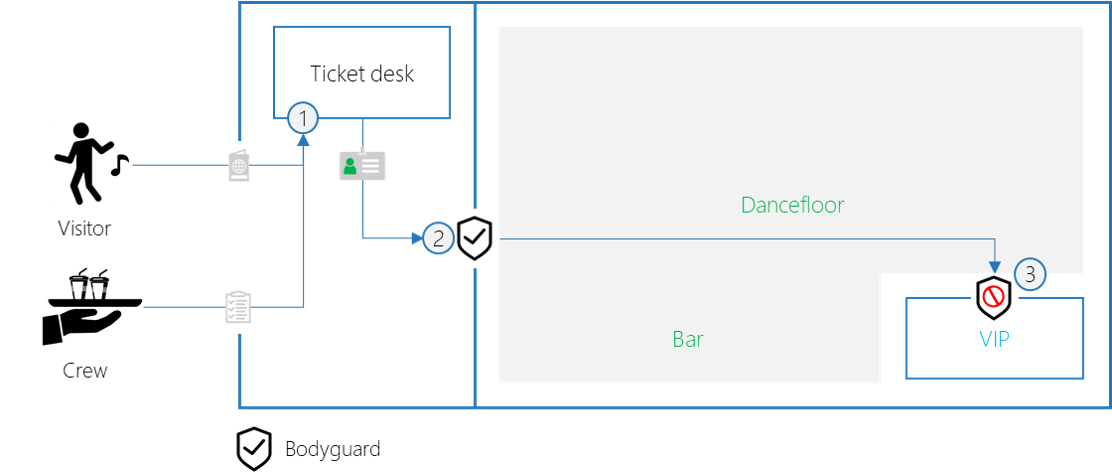
Getting back to our party scenario: all people are allowed to access the bar and the dancefloor. However, only a limited audience can enter the VIP area.
- The ticket desk gives each authenticated user a badge, with a color code.
- The bodyguard only allows people with a valid blue or green badge to the party.
- The bodyguard of the VIP room only allows persons with a blue badge.

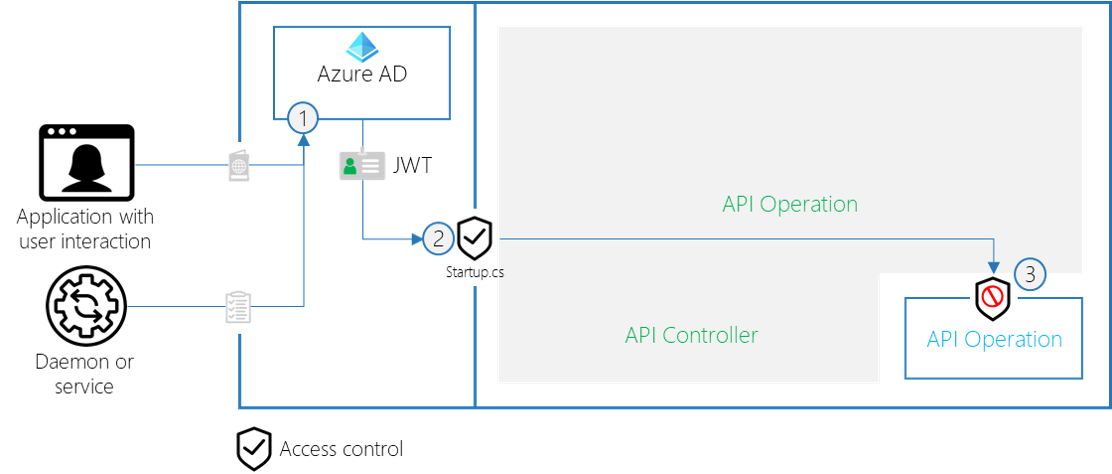
For the API security, we identify the following steps:
- Azure AD returns an access token (JWT) that contains a role (regular or VIP)
- The API has a global security to only allow access tokens with the regular or VIP role
- An operation-specific security check only allows VIP users to call the API operation

Application Roles are ideal for these security requirements:
- There could be potentially many applications and users that consume the API
- Authorization must be done based on user and application tokens
- The authorization must happen on multiple levels (API / controller / operation)
- The authorization requirements fit a role-based model
Azure AD Configuration
In Azure AD, we have define the application roles and assign them to the user and or application.
Define application roles
Time to define the two roles for our Party API!
- Navigate to the party-api App Registration
- Open the App roles tab, this is at the time of writing still in preview
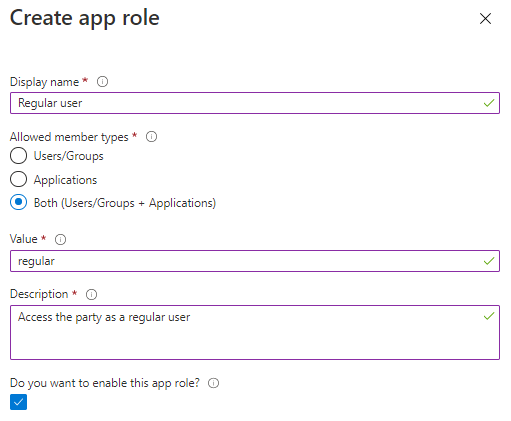
- Click on `+ Create app role`, configure the Regular role and click Apply
- Display name: Regular user
- Allowed member types: Both
- Value: regular
- Description: Access the party as a regular user
- Enabled: yes

- Click on `+ Create app role`, configure the VIP role and click Apply
- Display name: VIP user
- Allowed member types: Both
- Value: vip
- Description: Access the party as a VIP user
- Enabled: yes
Assign role to user
These steps are needed to assign a role to a specific user:
- Navigate to the party-api Enterprise Application, which is the implementation of the app registration in your specific tenant.
- In the Users and groups tab, click `+ Add user`

- Select the user that you’ve used previously and choose the Regular user role and click Assign

Roles can also be assigned to Azure AD groups. The direct members of the Azure AD groups, get automatically that role assigned. In case you are using nested groups, e.g. when syncing from a local AD, you should be aware that the role gets not propagated to members of the nested Azure AD group!
Assign role to the daemon application
These steps are needed to assign a role to our daemon application:
- Navigate to the daemon-client-app App Registration
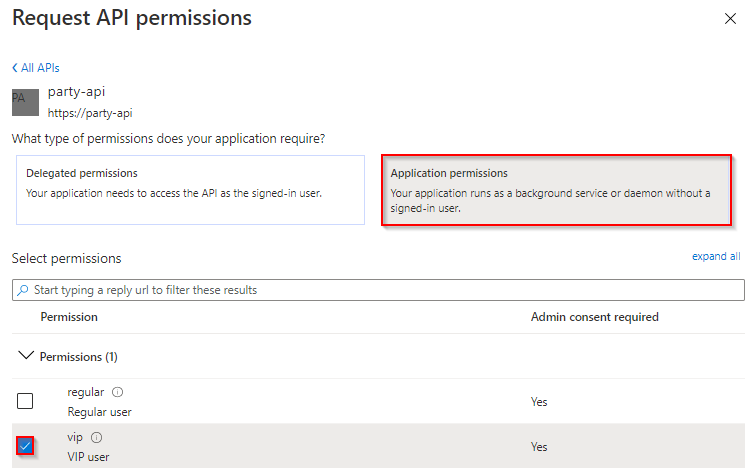
- In the API Permissions tab, click on `+ Add a permission`
- Select the party-api, under the My APIs tab
- Select Application Permissions, choose the VIP User role and click Add permissions

- An Azure AD administrator must Grant admin consent for <Your Directory>

Inspect access tokens
We need to authenticate our user and daemon app again, so the application roles are taken into account.
- Authenticate the Daemon App again via Postman, as described in Part 3.
- Inspect the access token, you should see that the vip role claim is added

- Authenticate the User App again via Postman, as described in Part 3.
- Inspect the access token, you should see that the regular role claim is added
Implement RBAC on the API
Global role enforcement
First, we need to ensure that only Regular and VIP users can access the Party API.
- Open the PartyApi solution from the `02-with-authentication` folder
- Update the AuthorizationPolicyBuilder in the Startup.cs file, to check on the mandatory roles
var policy = new AuthorizationPolicyBuilder()
                 .RequireAuthenticatedUser()
                 .RequireRole("regular", "vip")
                 .Build();
- From now on, calling the API will only succeed if the regular or vip role claim is present in the access token.
Specific role enforcement
Another thing we have to ensure, is that only VIP users can enter the VIP area.
- Decorate the GetIntoTheVip() operation of the PartyController, to require the vip role
[HttpGet]
[Authorize(Roles = "vip")]
[Route("vip")]
public PartyExperience GetIntoTheVip()
- Calling the party/vip operation as the Daemon App should result in a 200 OK
- Calling the party/vip operation as the User App should result in a 403 Forbidden
Conclusion
Implementing role-based access control with Azure AD is my preferred authorization mechanism. It’s very clean and explicit, it supports both users and applications and access rights can be easily modified without impacting the application itself.


